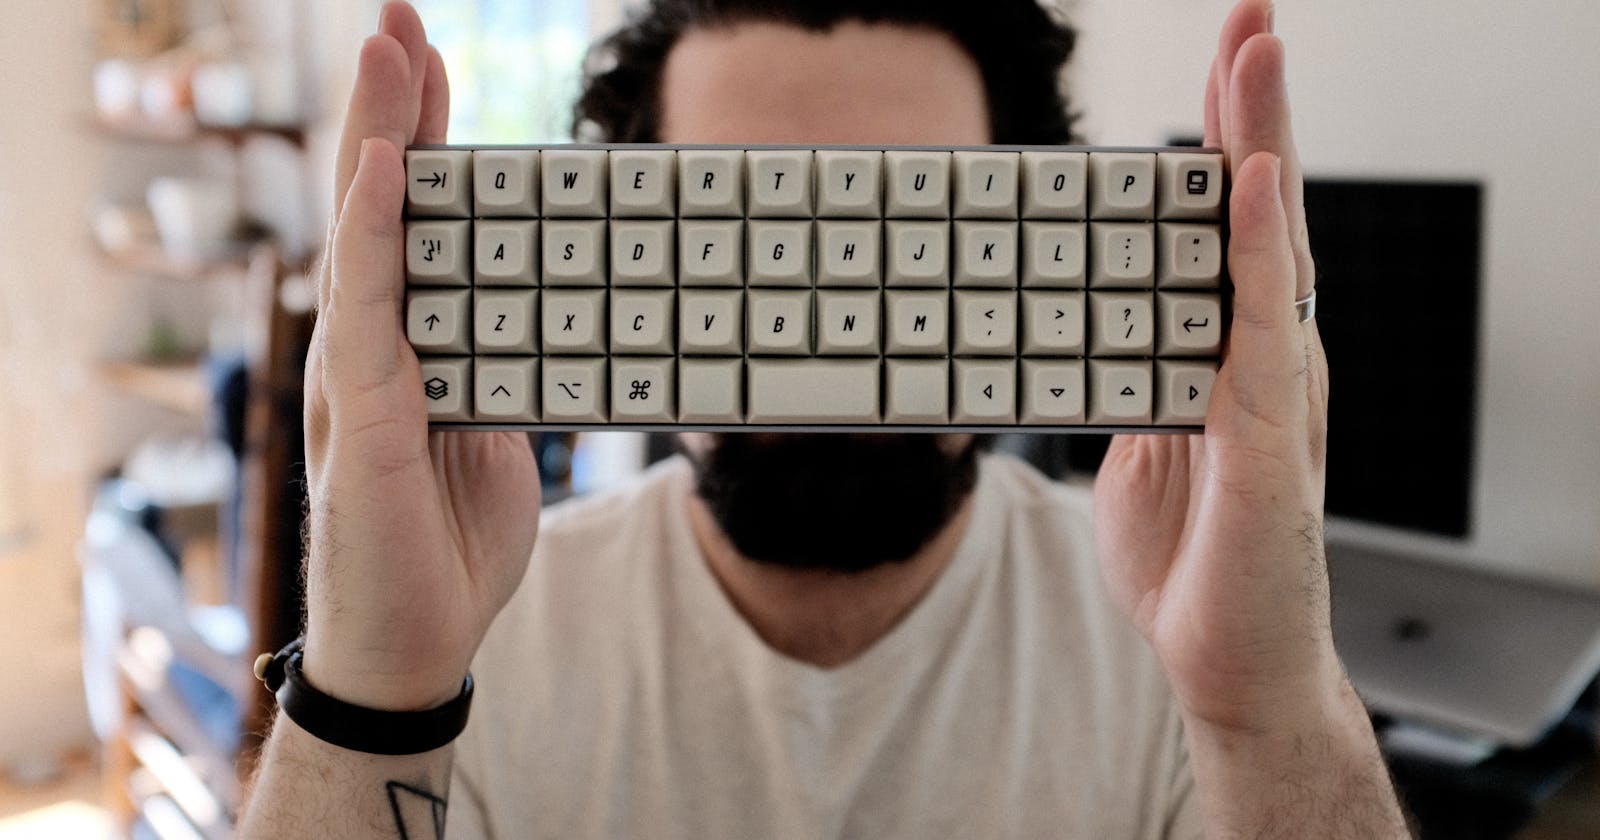
Mechanical keyboards has been an increasing popular hobby for gamers and tech enthusiasts, and thanks to brands like Keychron it is now easier than ever to dip your toes in this very deep lake. If you're not familiar with mechanical keyboards I would highly recommend you check out Taeha's video why you may want to consider using one. In brief, a mechanical keyboard used mechanical switches for each key. There are a vast multitude of cases, plates, circuit boards, switches, keycaps, and more, and enthusiasts will spend hours crafting their own custom keyboards.
One mechanical keyboard I recently built myself is the OLKB Planck 40% keyboard. Keyboards usually come in different shapes and sizes, and are categorized by how many keys they have. For instance, a 65% keyboard means it only has 65% of a full sized keyboard. So as you can imagine, 40% is hardly any keys left! It's really just the letters and some keys on the sides and bottom row, a total of only 48 keys. The big two questions most people have when they see these monsters are "how do you use that thing?" and "why would you use such a small keyboard?" Well, I hope to answer those questions here!
Why?? 🤨
I've spent the last several years working a 9-5 job in operations for a local bank, and the main application we use to access all of our core information isn't made to be used with a mouse. Pretty much everything you do has to be done with a keyboard, and it's really not intuitive. After using similar systems in retail, I got the hang of it in not too much time. The bank employees that work in the branches got a mouse interface to use for themselves, which I could use now, but I realized that I was much faster in the older system using the keyboard! That brings up an important principle: if you can reduce motion, you gain the ability to be faster. I knew deep down that if I put in the time, I could make the 40% keyboard faster than my normal keyboard because I knew it would be faster to press an extra key than stretching a finger out of home row.
This is a general productivity tip that some might be familiar with, and that is keyboards are generally faster than using a mouse. The number of inputs we can make with a keyboard is far faster and efficient than using a mouse, however some would argue that in most cases a mouse feels more natural. That's why they took over the world of computers when they were introduced; it just felt more natural. That might be well and good, but if you really want to boost your productivity, nothing beats the keyboard.
One other minor point I will add here is that my 40% keyboard is Ortholinear, that means instead of the keys being staggered, there are perfectly lined in rows like a grid. This does take some getting used to, but the benefits would be healthier hand movement. We contort our fingers into horrible positions to reach our poorly laid out keys which can cause carpel tunnel and other health problems. Ortholinear keyboards are the gateway to ergo-dynamic set ups that can extend your hand life.
How?? 🧐
The key to using a keyboard like this is something called "layers." You may not know this, but you already use layers on your keyboard! For instance, when you hold down the shift key, it is actually taking you to a new layer where all the alphas are uppercase and the numbers turn into their respective symbols. Then just think what happens when you hold down option; all sorts of crazy symbols can come out of your keyboard! We use the same concept for these keyboards, and since we rarely need those odd symbols it can be pretty easy to make a layout that makes sense and commit it to memory.
One of the great things about my particular keyboard is that it is QMK compatible, which means using the QMK tools I can flash a firmware to the keyboard with any layout I want! It gives me tons of flexibility, so much that I could have 15 different layers if I wanted to, but that does kinda sound like a nightmare!! Let's go over each of the layers I have set up on my keyboard:
Layer 0
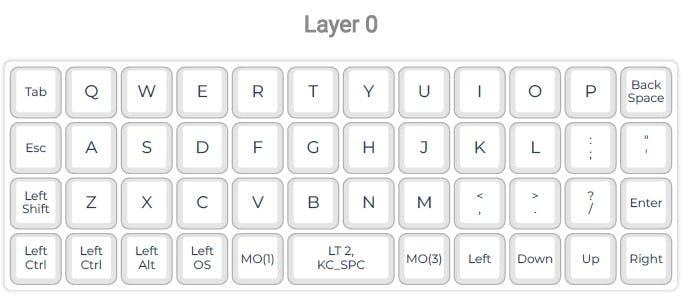
Starting with the base layer, these are the keys that will be entered into the computer if I just tap them; pretty straight forward. Arrow keys are in a line, similar to how VIM is set up for text navigation so that was pretty easy to adapt to. Most of the others are self-explanatory, but the three keys of interest are the space bar, and the two keys beside it. These keys give me access to all my different layers that I use to get all the other keys not on layer 0.
Layer 1
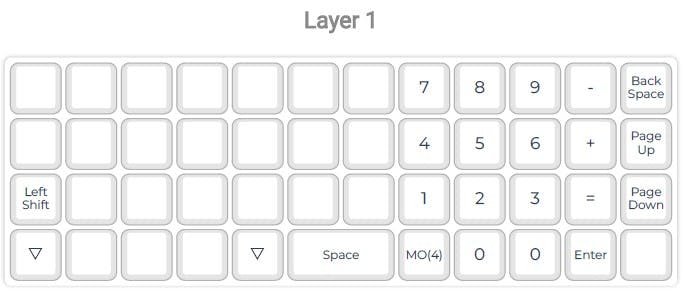
Here is our first layer, and this was one of the best things I have experienced with a keyboard! When I hold down on the layer key left of the spacebar, it turns the block of keys on the right side into a number pad! I have always had to type numbers quickly, and working at a bank I got speedy with a num pad; it just feels so much more natural than using a number row above the alphas. I also kept the backspace key in the top right corner, as well as adding page up and page down.
Layer 2
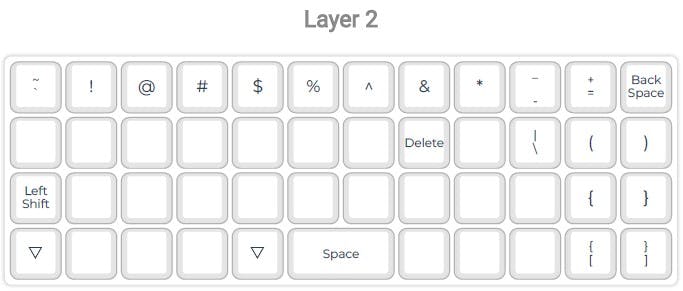
This layer is how I access my symbols and brackets which is super important for programming. You know what's the best part about this layer? Well, in QMK there is a feature you can use that if you tap a key, it produces one thing, but if you hold it, you can access another layer! So for this layer I'm actually holding down the spacebar key to access it, which is just a dream since it's easy to find and keeps all may layer keys in one spot! For this layer I have all of the symbols on the top row, and putting those to memory takes some getting used to. I also have found myself needed the delete key for my bank job, so I have that on the "J" key (index finger on home row). Then I have all my brackets on the right side, opening and closing for each which makes it super easy to remember.
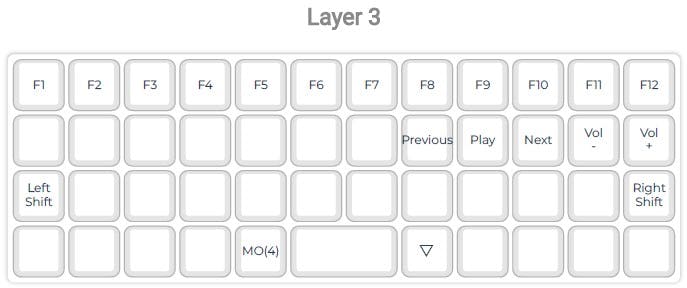
Layer 3
I access this layer with the key to the right of the spacebar and it contains my function key row, which I normally wouldn't use for programing that much but it is necessary for my bank job. I also used it to access my media controls!
Layer 4
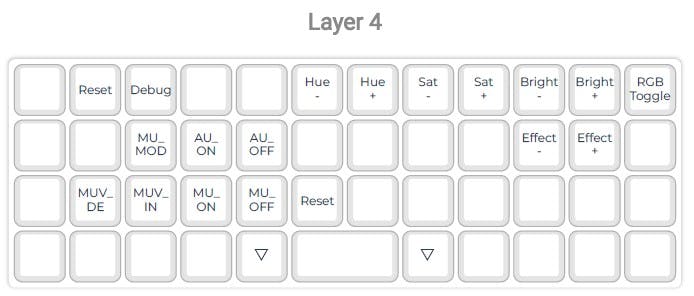
The final layer! This one is accessed by holding down both layer keys to the left and right of the spacebar. This last layer is really just some odd ball settings and features. This keyboard has limited RGB, but it is there and I can control the color, brightness, and whether its on or off. On this layer there is also the important reset and debug keys in case something isn't working. I also have some keys for the musical function this keyboard has! Its a small speaker and you can play full scales, change sounds, its pretty wild and I haven't had the time to mess around with it that much yet.
Should you get one? 💸
40% Keyboards definitely are not for everyone, hell 65% keyboards are a stretch for most people. Although it's an acquired taste, I think if you're someone who drives to be more proficient and faster, this could be something you should try out! I knew it would take work and time to adjust to this keyboard, but I'm glad I put in the work because the rewards are great. My fingers already feel better after longer typing periods since they're not stretching to find keys, and my typing speed has already surpassed the 100wpm that I had achieved on my 65% keyboard!
So should you get one? Only if you're a hipster that likes to do everything the hard way, or if you like idea of multiplying your productivity and are willing to put in the hard work 😉 If it's not for you, I would still encourage you to try out a mechanical keyboard!! There's so many different styles, price points, sizes, it just never ends. Nothing feels better than typing on a good keyboard, and in my opinion if you're going to spend the majority of your life typing, then it might as well be on something worthwhile.
Steve
